Оставить сообщение
Если вас заинтересовала наша продукция и вы хотите узнать больше подробностей, пожалуйста, оставьте сообщение здесь, мы ответим вам как можно скорее.

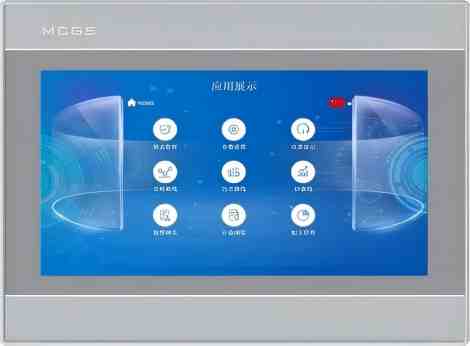
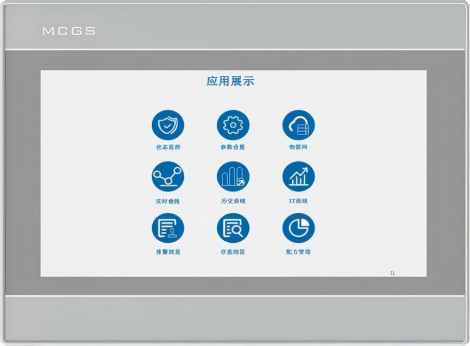
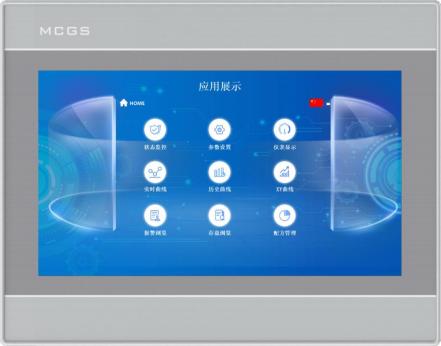
Разработанные компанией Kunlun Tech, терминалы TPC серии K относятся к интеллектуальным человеко-машинным сенсорным терминалам среднего и высокого класса, способным удовлетворить широкий спектр потребностей пользователей в различных сценариях.
Номер изделия :
TPC7051KiМинимальный объем заказа (MOQ) :
50Оплата :
Paypal\TT\Western UnionПроисхождение продукта :
Guangdong, ChinaМасса :
1KGОриентируясь на интуитивно понятное взаимодействие человека и машины, серия K может похвастаться широким набором периферийных интерфейсов. Вся серия по умолчанию работает с разрешением 800x480, а 10-дюймовая модель имеет разрешение 1024x600. Пользователи могут выбрать 128 МБ или 256 МБ оперативной памяти, а также 512 МБ и 8 ГБ различных объемов хранилища. Встроенный полный набор интерфейсов расширения также имеется.
Технические характеристики изделия
Классификация | Элемент | TPC7051Ki |
Характеристики продукта | Жидкокристаллический экран | 7-дюймовый TFT-дисплей |
Тип подсветки | ВЕЛ | |
Отображение цвета | 262K | |
Разрешение | 1024×600 | |
Яркость дисплея | 350 кд/м² | |
Тип сенсорного экрана | 4-проводной резистивный | |
Входное напряжение | 24±20% В постоянного тока | |
Изоляция питания | Встроенный | |
Номинальная мощность | 8W | |
Процессор | Четырехъядерный процессор Cortex-A53, 1 ГГц | |
Оперативная память (RAM) | 512 МБ | |
Системное хранилище | 512 МБ | |
Общий объем хранения | 512 МБ | |
Аппаратные часы | Встроенный | |
Программное обеспечение для настройки | McgsPro 3.3.6.6354 SP1.3 Версии 1 и 2 | |
Внешний интерфейс | Последовательный интерфейс | Способ 1: COM1(232) COM2(485) COM3(485) COM4(232) Способ 2: COM1(232) COM4(232) COM9(422) |
USB-интерфейс | 1 хост, 1 раб | |
Порт Ethernet | 1 × 10/100M Адаптивный | |
Условия окружающей среды | Рабочая температура | 0°C ~ 45°C |
Рабочая влажность | 5% ~ 90% (без конденсации) | |
Температура хранения | -10°C ~ 60°C | |
Влажность хранения | 5% ~ 90% (без конденсации) | |
Технические характеристики изделия | Материал корпуса | Инженерные пластмассы |
Цвет корпуса | Серебро | |
Внешние размеры | 203 мм × 149 мм | |
Размер выреза в панели | 192 мм × 138 мм | |
Сертификация и соответствие требованиям | Сертификация продукции | Соответствует стандартам сертификации CE/FCC. |
Уровень защиты | Степень защиты IP65 (передняя панель) | |
Электромагнитная совместимость | Промышленный уровень 3 |
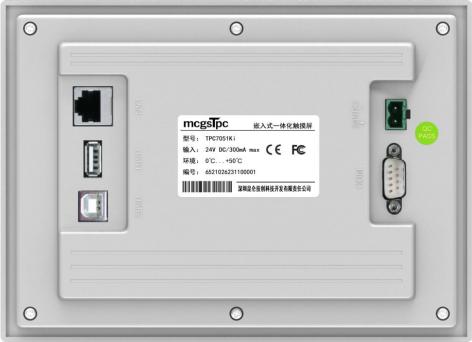
Описание интерфейса
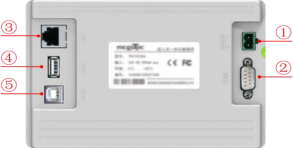
① | Источник электроэнергии |
|
| - | 1 | 0V |
+ | 2 | DC24V | ||||
② |
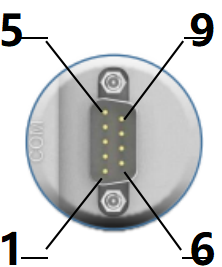
Последовательный порт |
|
COM1 | 2 | RS232 RXD | |
3 | RS232 TXD | |||||
5 | НД | |||||
COM2 | 7 | RS485+ | ||||
8 | RS485- | |||||
COM3 | 4 | RS485+ | ||||
9 | RS485- | |||||
| 1 | RS232 RXD | ||||
КОМ4 | 6 | RS232 TXD | ||||
| 5 | НД | ||||
КОМ9 | 7 | RXD+ | ||||
8 | RXD- | |||||
4 | TXD+ | |||||
9 | TXD- | |||||
Примечание: COM9, COM2 и COM3 нельзя использовать одновременно. | ||||||
④ | Сетевой порт | Адаптивный Ethernet-порт 10M/100M, позволяющий загружать или выгружать проекты и обновлять операционную среду (для работы экрана требуется Pro 3.3.2 и выше), а также взаимодействовать с другими устройствами. | ||||
⑤ | основной порт USB1 | USB 2.0, поддержка через U-образный диск. Диск обновляет операционную среду сенсорного экрана, проецирует изображения, систему и предоставляет такие функции, как импорт и экспорт данных. | ||||
| USB2-порт | USB Public (B) (тип ), который позволяет загружать или скачивать проекты. | ||||
Установка изделия
l Размеры изделия
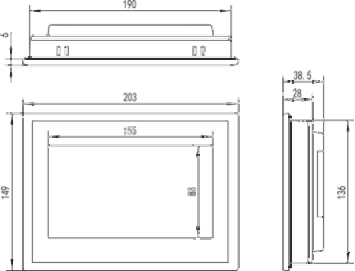
Внешние размеры
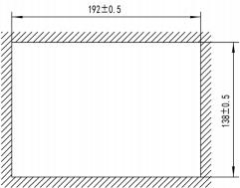
Размер отверстия
способ установки

Установка крючка
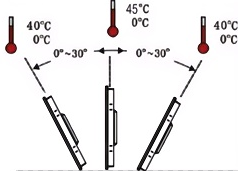
Угол установки
Техническое обслуживание продукции
1.5.1 Сменная батарея
Расположение батареи: TPC (технологическая плата) на печатной плате внутри изделия.
Технические характеристики батарей: литиевые батареи CR2032 3 В.
Чтобы извлечь батарею: снимите защитную пленку с верхней части батареи, аккуратно переместите положительную клемму в положение батареи, и батарея автоматически выскочит.
Установка батареи: Сначала вставьте батарею в зажим положительной клеммы, а затем аккуратно надавите на другой конец под пластиковый зажим. Убедитесь, что оба пластиковых зажима и металлический зажим положительной клеммы правильно вставлены.
При установке будьте осторожны и избегайте короткого замыкания положительной и отрицательной клемм аккумулятора.
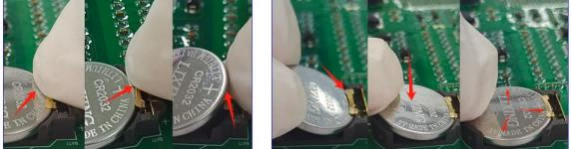
Извлеките батарею. Установите батарею.
1.5.2 Калибровка сенсорного экрана
В интерфейсе настроек системы нажмите и удерживайте пустое место. 3 Процесс калибровки сенсорного экрана начнётся через несколько секунд.
Калибровка TPC: С помощью стилуса или пальца слегка нажмите и удерживайте центральную точку перекрестия курсора. Когда курсор переместится в следующую точку, отпустите его. Повторяйте это действие, пока не появится сообщение «Измерены новые параметры калибровки». Нажмите кнопку «Подтвердить калибровку», чтобы сохранить и выйти из программы калибровки.
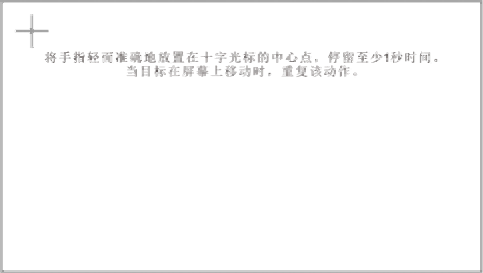
Слегка и точно поместите палец в центр перекрестия курсора и удерживайте его не менее одной секунды, пока цель перемещается по экрану. Повторите это действие.
1.5.3 Трехслойная пленка
Нанесение защитной пленки на TPC эффективно предотвращает попадание пыли, масла и других загрязнений, образующихся в процессе производства, на поверхность. TPC подвержен коррозии, поэтому при необходимости для защиты TPC можно использовать защитную мембрану. Для защиты... В этой статье рассматривается... 1271Gn Мы будем использовать это в качестве примера для объяснения; другие модели будут рассмотрены позже. TPC Шаги по нанесению защитной пленки на экран аналогичны.
Необходимые инструменты: В комплект TPC входит защитная пленка (приобретается у поставщиков экранов), пылезащитная ткань, антистатическое экологически чистое чистящее средство и валик.
Этапы выполнения операции:
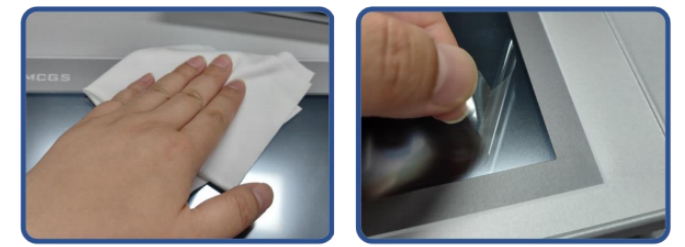
1) Очистите экран. Используйте тряпку для удаления пыли, чтобы удалить грязь с передней панели и предотвратить образование пузырьков при нанесении защитной пленки. Если поверхность TPC сильно загрязнена, используйте чистящее средство, чтобы очистить загрязнения в щелях по краям.
2) Снимите заводскую защитную пленку из ПЭТ и очистите поверхность от остатков клея, чтобы предотвратить образование пузырьков во время нанесения.
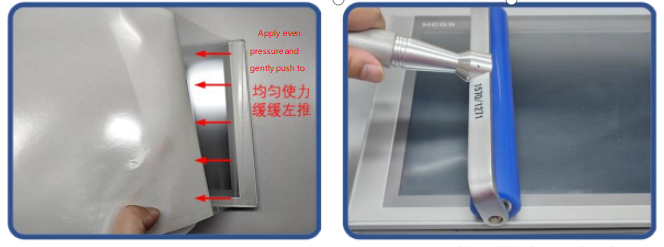
3) Отклейте уголок защитной пленки с правой стороны. Совместите правую сторону пленки с правой стороной TPC. Левой рукой медленно снимите защитную пленку, а правой рукой, равномерно надавливая, аккуратно прижмите пленку к экрану справа налево.
4) После нанесения пленки, используйте валик, чтобы плотно прижать клеевую основу и предотвратить образование пузырьков воздуха.
Меры предосторожности:
1) Перед нанесением защитной пленки с трехслойной защитой необходимо снять заводскую защитную пленку. Защитная пленка из ПЭТ
2) Трехслойная пленка является расходным материалом. Если края начинают отслаиваться или вздуваться, необходимо наклеить новую пленку.
3) При установке защитной пленки на место, аккуратно подденьте ее с нижнего правого угла передней панели, стараясь не поцарапать уплотнительную пленку.
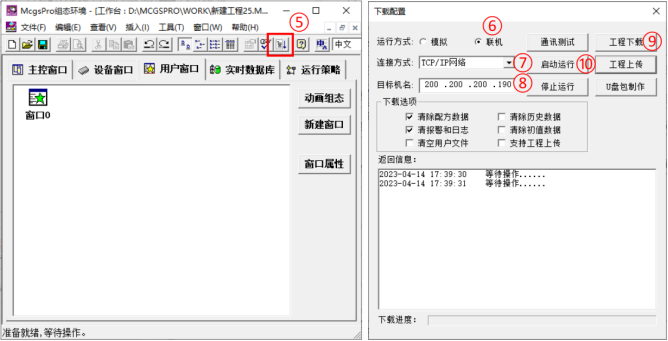
2 Загрузка проекта
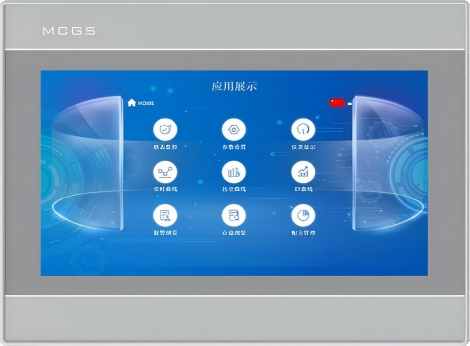
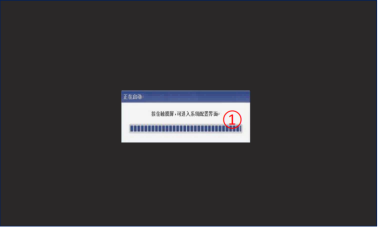
Шаг 1: Используйте источник питания 24 В постоянного тока. После включения и запуска на экране появится индикатор выполнения «Запуск». На этом этапе нажмите... TPC①, и вы перейдете к интерфейсу настройки запуска. Если никаких действий не будет предпринято, вы автоматически перейдете к интерфейсу запуска проекта.
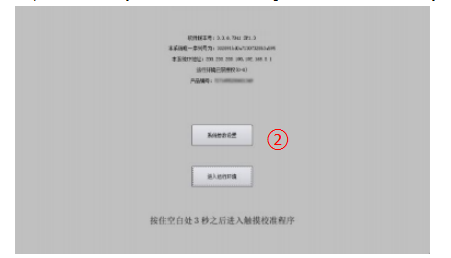
Шаг 2: Нажмите кнопку «Настройки системных параметров» ②. Войдите в интерфейс настроек системы TPC.
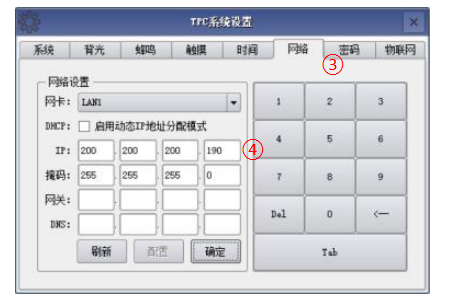
Шаг 3: Выберите вкладку «Сетевые настройки» ③ и настройте... IP-адрес TPC 4, IP-адрес TPC по умолчанию — 200.200.200.190.
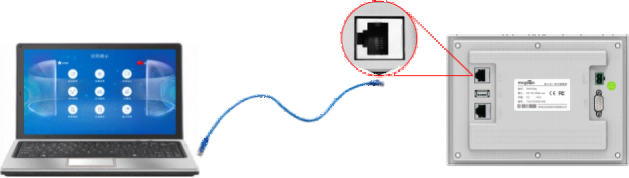
Шаг 4: Подключите компьютер и... TPC, а также IP-адрес компьютера. Установите IP-адрес подключенного порта LAN TPC в один и тот же сетевой сегмент.
Шаг 5: Используйте MCGS Pro. Откройте проект TPC, нажмите кнопку загрузки проекта ⑤, откройте страницу свойств конфигурации загрузки и выберите режим запуска «Онлайн». Выберите способ подключения «TCP/IP» «Сеть» ⑦. Введите имя целевой машины TPC или IP-адрес ⑧, нажмите «Загрузить проект» (⑨). После успешной загрузки нажмите «Запустить» (⑩) или... TPC. Кнопка «Войти в среду выполнения» в интерфейсе запускает проект на экране.

Оставить сообщение
Отсканируйте QR-код для отправки в WeChat :

Отсканируйте в WhatsApp :